Other features
Managing your account
Managing your team and users
- How to add a user?
- How to delete a user?
- What’s the difference between a “Manager” and an “Operator”?
Creating and managing measurements
Managing your devices
- How to add a new luminometer?
- How to perform a luminometer and reagent check?
- Why does “Maintenance required” appear next to my luminometer?
Interpreting and using your data
How to log in?
Don’t have an account yet?
If you are a user of DENDRIDIAG® ATP-metry, you can request the creation of your account directly from the app:
Click “Request access” and fill out the form.
Once your request has been approved, you will automatically receive an invitation email.
Have you received an invitation email?
-
Open the email sent by GL BIOCONTROL.
-
Click the “Join now” button.
-
Set your personal password.
-
You will then be redirected to the application and logged into your user area.
Need help?
If you can’t find the invitation email (make sure to check your spam folder), or if you’re experiencing any login issues, please contact the GL BIOCONTROL team directly.
How to add a new measurement?
- In the application menu, click Measurement.
-
Check the date and time — they are filled in automatically, but you can adjust them if needed.
-
Enter the lot number of the DENDRIDIAG® kit used (optional).
-
Select your sampling point from the list.
If you can’t find the sampling point, click the refresh button.
If it still doesn’t appear, go to Sampling points and create it. -
Select your luminometer from the list (optional).
If your device isn’t listed, go to Luminometers and add it. -
Enter the filtered volume for the ATP-metry measurement.
-
Enter the R1 and R2 values provided by the luminometer.
-
Fill in the physico-chemical parameters you measured.
-
Click Save to record the measurement.
The measurement isn’t valid — why?
A measurement is invalid when the value of “R2 − R1” is less than 200 RLU.
This alert indicates that the Standard was not added correctly. Most often, this is due to insufficient mixing of the Standard with the sample. Tap the lumitube on a flat surface, mix thoroughly, and rerun the measurement.
If the problem persists, several factors may be involved:
-
Reagents and/or the sample are too cold. The analysis must be performed at a temperature above 18 °C. Warm the reagents and repeat the measurement.
-
The enzyme in the lumitube is not sufficiently active (expired or degraded). To check the condition of the reagents, perform a luminometer and reagent check.
-
The sample has an inhibitory effect. Repeat the measurement, rinsing the membrane with sterile water or a specific solution after filtering the sample (contact GL BIOCONTROL for more information)
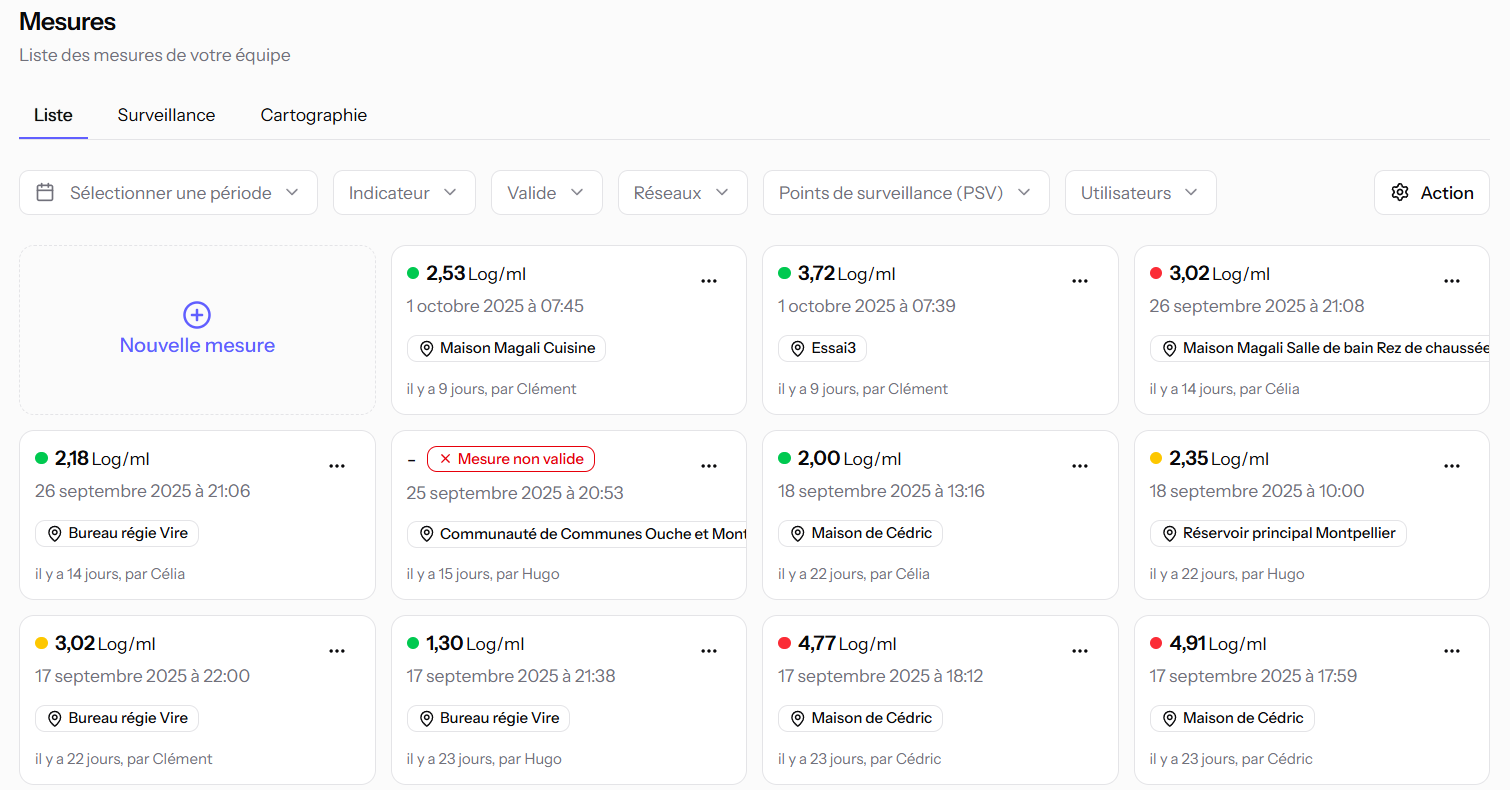
How to view the measurement history?
This tab allows you to view all measurements performed by you and your team.
For better readability, use the filters to sort your sampling points.
You can export the selected data in CSV format by clicking the Action button, then Export CSV.
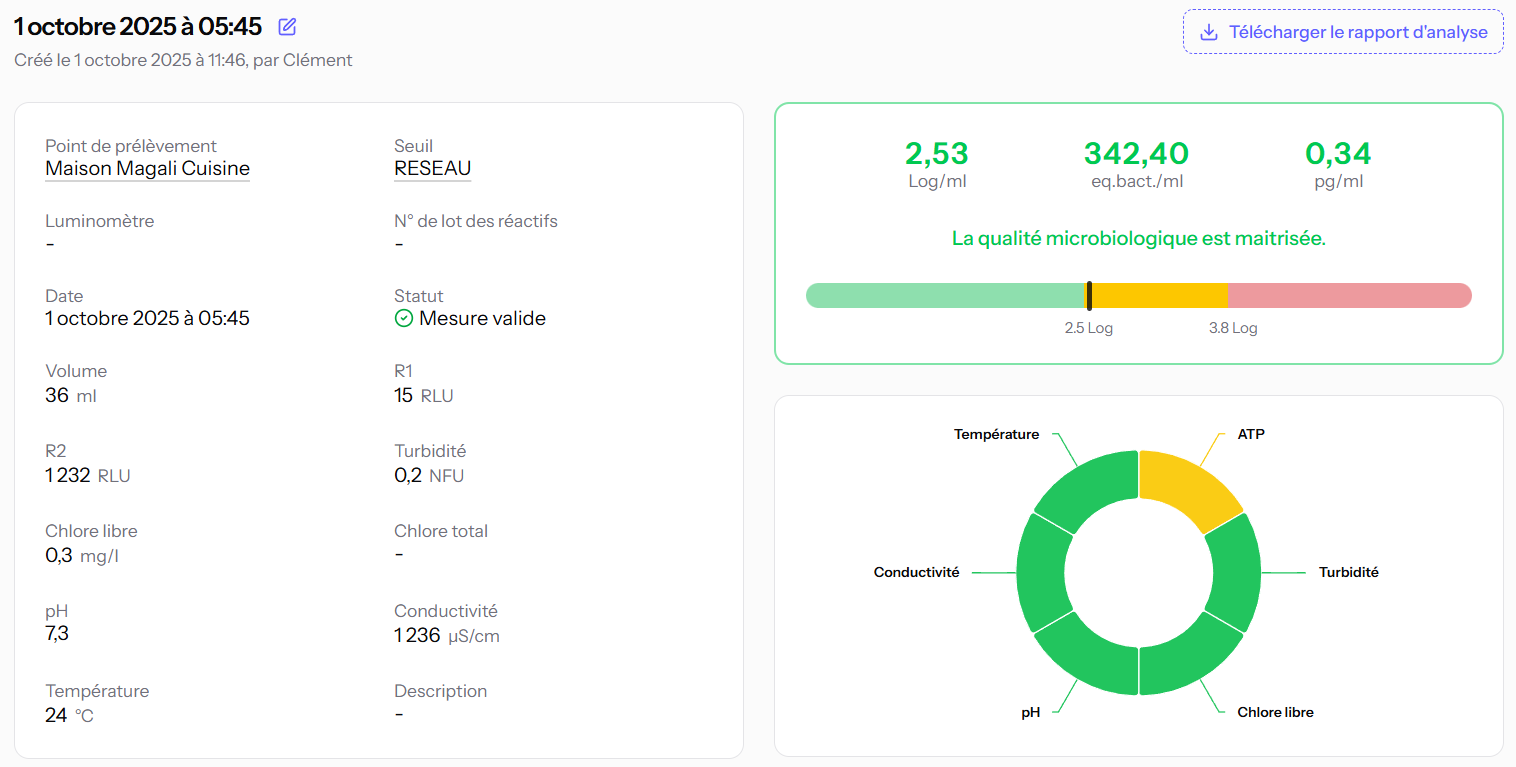
Measurement details
By clicking on a measurement, you can:
-
View all recorded information (ATP data, physico-chemical parameters, filtered volume, etc.)
-
See the interpretation of the result provided by the application
-
Download the analysis report in PDF format
How to edit or delete a measurement?
In Measurements, hover over the measurement of your choice and click Edit or Delete.
Warning: Deleting a measurement is permanent and irreversible.
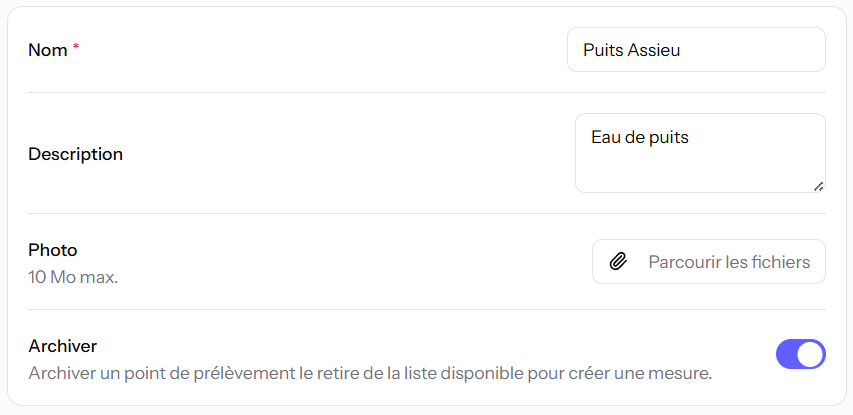
How to add a new sampling point?
-
Click Sampling points, then New sampling point.
-
Enter the name of the sampling point.
-
You may also add a description and a photo (optional).
-
Select the threshold associated with this sampling point.
-
Fill in the sorting fields to make it easier to search and filter your points later (optional).
-
Locate the sampling point using one of the following methods (optional):
-
Enter the GPS coordinates.
-
Type the address in the search bar.
-
Zoom in on the map and click to place the marker, then move it if necessary.
-
- Click Save to confirm the creation of the sampling point.
You can also duplicate an existing sampling point to quickly create a new one with the same information.
To do so, hover over the desired point, click the three dots in the top right corner, then select Duplicate..
How to archive a sampling point?
In the Sampling points section, select the point you wish to archive and click Edit.
Enable the Archive option.
Once archived, the sampling point:
- No longer appears in the list when creating a new measurement or generating a graph;
- Remains visible in the sampling points list, identified by the label “Archived”;
- Keeps all associated measurements, which remain accessible and exportable.
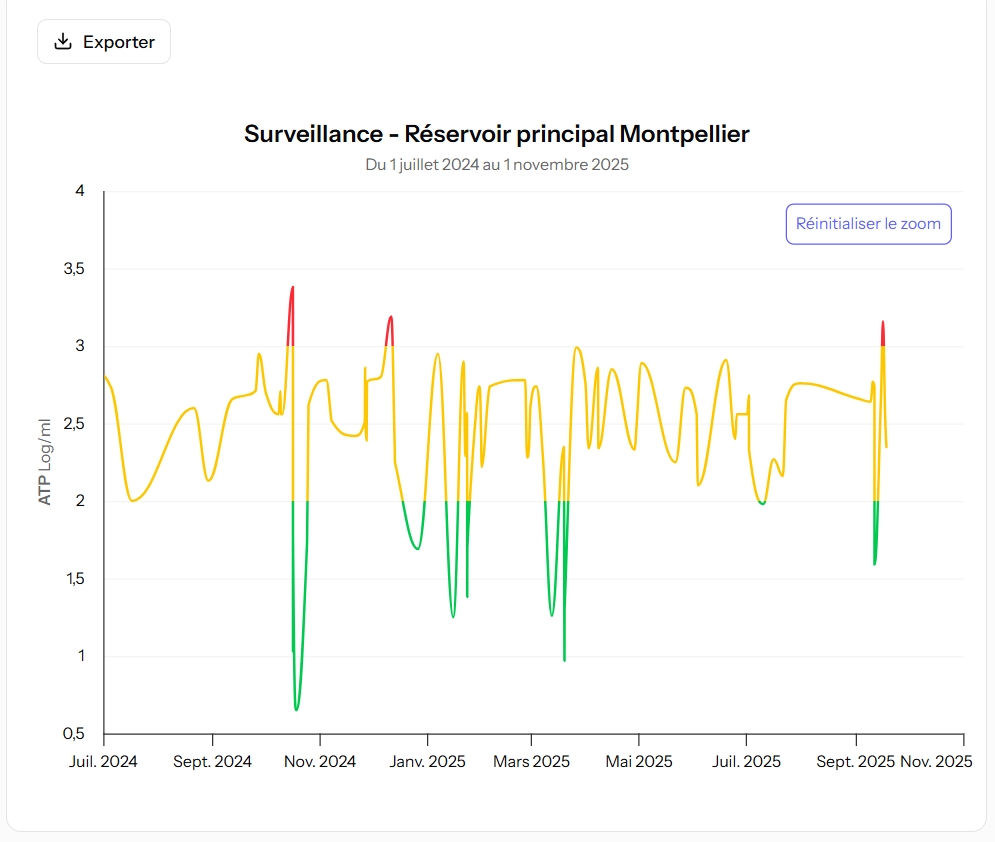
How to create a graph?
In Measurements, you can generate different types of graphs to analyze your data.
Monitoring:
This feature allows you to visualize the evolution of one or several sampling points over time.
-
Select the parameter(s) to display.
-
Choose one or more sampling points.
-
Click Generate to draw the graph.
Mapping:
This view allows you to visualize the condition of your network at a specific date or over a selected period, providing an overview and helping to identify any potential anomalies.
-
Select the parameters to display.
-
Choose one or several dates.
A bar chart is automatically generated.
You can zoom in on a specific area by clicking and dragging with the left mouse button.
Graphs can be exported in JPG or SVG format for use in reports or presentations.
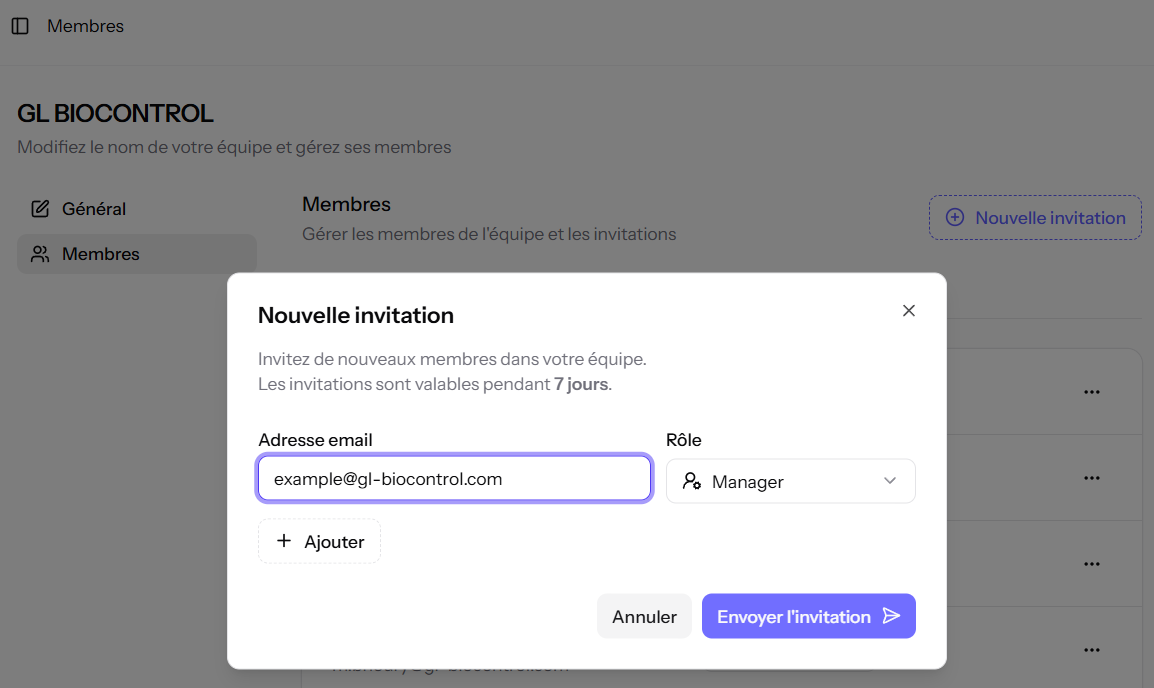
How to add a new user?
In the sidebar, click Settings, then Members.
- Click the New invitation button.
- Enter the email address of the user you want to invite.
- Assign their role:
Manager – Manages all team resources and can add new members.
Operator – Manages only their own measurements and sampling points. They cannot modify or delete those created by others.
You can invite multiple users at once by clicking the Add button. - Click Send invitation.
How to delete a user?
In the sidebar, click Settings, then Members.
Find the user you want to remove, click the three dots, then select Remove from team.
Warning: Deleting a user is permanent and irreversible.
All data created by this user (measurements, luminometers, sampling points, etc.) will be retained and remain accessible to the team.
What is the difference between a “Manager” and an “Operator”?
Manager
The Manager is responsible for the overall management of the team and has full access rights to all group resources.
They can:
- View, edit, or delete all measurements performed by operators;
- Add, modify, or delete sampling points, luminometers, and thresholds;
- Invite new Managers or Operators to the team.
Operator
The Operator is a standard user, responsible for their own data.
They can:
- Create, edit, and delete their own measurements, sampling points, and luminometers;
- View measurements created by other team members (Managers or Operators),
but cannot edit or delete them.
How to add a threshold?
In the sidebar, click Thresholds, then New threshold.
Enter the name of the threshold.
Select the threshold values for each available parameter.
Click Save to confirm the creation of the threshold.
The defined thresholds can then be linked to your sampling points to help with result interpretation.
How to add a new luminometer?
In the sidebar, click Luminometers, then New luminometer.
- Enter the name of the device.
- Enter the serial number of the luminometer.
To find it, press “Push” on the back of the device, then remove the cover.
The serial number consists of 13 digits and 1 letter for SMART models, and 11 digits and 1 letter for PD20/PD30 models.
- Enter the date of the device’s last maintenance.
- Click Save to confirm the addition of the luminometer.
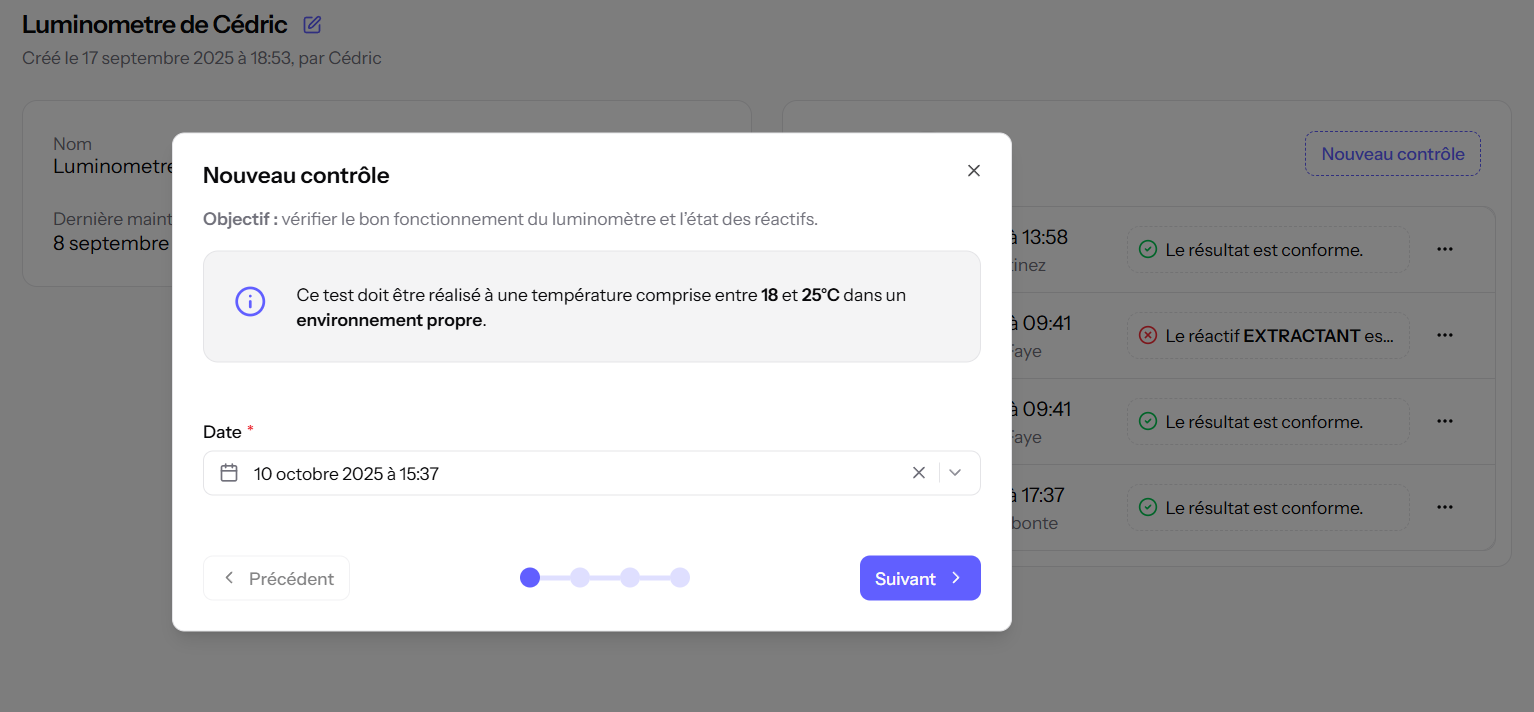
How to perform a luminometer and reagent check?
- In the sidebar, click Luminometers.
- Select the device you want to check, then click New check.
- Follow the on-screen instructions — the application will guide you step by step through the test.
Important: This check must be performed at a temperature between 18 °C and 25 °C, in a clean and stable environment.
We recommend verifying the proper functioning of your luminometer every three to six months, depending on how frequently it is used.
Why does “Maintenance required” appear next to my luminometer?
If you entered a last maintenance date older than one year, the following message will appear:
“Maintenance required: warning, the last maintenance of your luminometer was performed over a year ago.”
For optimal performance of your measurement device, we recommend carrying out annual maintenance.
GL Biocontrol offers this service, which includes:
- Cleaning and disinfecting the measurement chamber and cell;
- Checking the device’s response using calibrated ATP solutions and positive and negative controls;
- Issuing a control certificate to be presented during audits.
Can I take a measurement offline?
Yes, it is possible to perform a measurement offline.
To do so, preload the “One-time measurement” page — available before logging into the application — while you still have network access.
You can then enter the measured values and generate a report to save the measurement.
How to delete your account?
In the application menu, click your name at the bottom left, then select Settings.
At the bottom of the page, click Delete your account.
En bas, cliquez sur Supprimer votre compte.
Warning! Once your account has been deleted, you will no longer be able to access any of your data or account information.
Before proceeding, make sure to save any important information.
This action is irreversible.